Tag Archives: kids

Peanut Butter Candy

Peanut Butter CandyGrowing up my mom made peanut butter candy all the time.  It was simple to throw together anytime a sweet craving hit you.  We would find bowls of it in the kitchen and walk by and snag a bite or two.

I haven’t thought about this recipe in a long time.  Looking through the good old recipe box I found the recipe.  We had my nieces over to play and I thought it would be fun to make.  This no cook recipe is great to do with kids.  Although it takes a lot of muscle to mix it.  The kids loved it and had plenty to take home to share.  I can’t wait for Mr.Picky to get home and try it because his favorite candy is peanut butter cups.

The texture of this candy is almost like a chewy caramel but more dense.  It has a wonderful peanut butter flavor.  If you are feeling extra naughty you can cover it with melted chocolate like we did.  Sometimes my mom would just roll it into balls and then into chocolate chips.  Or if you are feeling fancy roll it into balls and dip it into melted chocolate.

Peanut Butter Candy:

  • 1/3 cup karo syrup
  • 1/3 cup peanut butter
  • 1/2 cup nonfat dry milk
  • 1/3 cup powdered sugar

Stir together karo syrup and peanut butter until well combined.

In a separate bowl sift together dry milk and powdered sugar so there are no lumps.

Peanut Butter Candy

Combine the two together.  This is a slow process of mixing slowly and sometimes works best with your hands.  Eventually you can knead the candy on the counter to get it smooth.

Peanut Butter Candy

Shape into a roll on wax paper.

Peanut Butter Candy

Sprinkle with powdered sugar, nuts, chocolate chips, or spread with melted chocolate.  Then slice and serve.

Peanut Butter Candy

Store at room temperature but away from heat so you chocolate does not melt.


(adsbygoogle = window.adsbygoogle || []).push({});

Pita Bread Recipe

I made pita bread once long ago and had no idea what recipe I used.  I checked out one of my favorite sites and found Peppy’s Pita Bread Recipe – Allrecipes.com.  With a few alterations my pita bread was complete.  It is so simple if you have the time for the dough to raise.

We had a few girls over to play for the day and had fun rolling and stretching the dough.  It was even more fun to watch it bake and puff up in the oven through the glass oven door.  Of course everyone had to sample our creation which was almost as much fun to taste a completed project.

My plan for pita bread was to make it the day before my birthday party and serve it at the party.  We ended up eating a bit fresh.  With the rest of the bread I placed it in a sealable bag.  It sliced nicely into wedges just before the party to dip into some hummus.

Pita Bread:Pita Bread

  • 1 1/8 cup warm water
  • 3 cups flour
  • 1 tsp salt
  • 1 Tbs olive oil
  • 1 1/2 tsp sugar
  • 1 1/2 tsp dry yeast

Combine yeast, sugar, and water to proof until foamy.

Add in the oil to the yeast mixture.

In a bowl combine flour and salt.  Make a well in the center and add yeast mixture.

Knead until the dough becomes smooth and elastic.

Place the dough in an oiled bowl and cover with plastic wrap.  Allow to rise in a warm place for about 3 hours or until double in size.

Once dough had doubled roll into a rope shape.

Pita Bread

Pinch off 12 pieces and place balls on a floured surface to sit and rest for 10 minutes.

Preheat oven to 500 degrees with the rack at the bottom.

Pita Bread

Roll each dough ball to a 5-6 inch circle with  a rolling-pin or using your hands to stretch the dough.

Bake about 4 circles at a time for about 5-6 minutes.  Until puffy and slightly brown.

Pita Bread

Remove from baking sheet to cool on a rack.

Pita Bread

The bubble will deflate but when you cut open the pita bread there should be a pocket.


(adsbygoogle = window.adsbygoogle || []).push({});

Table bubbles

This is a repost from last year.  One this rainy day this seemed like just that activity to try again.  This time it was much more fun for my now 5-year-old and 2-year-old.  What a simple activity on a rainy day.

Table Bubbles

We had so much fun making table bubbles.  Not only did my 4-year-old have a blast but my 17-year-old nephew and husband played for at least an hour.  My 18 old month son didn’t care for it so much, as it was hard to blow the bubbles.  But he was more than willing to pop them as you blew them.

Table Bubbles

All that you need is:Table Bubbles

  • 1 med. size bowl
  • 1 dish rag or wash cloth
  • 1/2 cup of dish soap
  • 1/2 cup (or so) of water
  • some drinking straw
  • a table

I mixed the water and dish soap in a bowl with my dish rag.  You then wet the table with the dish rag, make sure you cover any area you are going to blow bubbles on with soapy water.  Next dip the end of the straw into the soapy bowl of water.  Using the soapy end of the straw place it on the wet table and blow away.

Table Bubbles

We were able to blow some huge bubbles.  Next thing you knew my daughter figured out that if you blew a bubble and dipped your straw again, you could go back inside the bubble without it popping.  Have fun and don’t put the wrong end of the straw in your mouth!


(adsbygoogle = window.adsbygoogle || []).push({});

I am alive but what just happened?

Thank you so much faithful followers for being so patient with me.  This last 2 months or so has been rough.  Life got the best of me and you all suffered.  I will be posting new recipes regularly again and can’t wait to hear how you like them.

Between 3 Holidays, 2 Birthdays, and moving life has just got the best of me.  Have you ever had a week that just doesn’t stop?  Well that is how I feel about the last two months.  I finally feel like I can breathe and most of my interior projects are done enough to live day-to-day.  Before I forget, we also added our first family dog which was just one more ingredient in the pot.

Our move was verily smooth.  Although Mr.Picky wanted to know how we acquired so much stuff.  I think he forgot that we didn’t have children the last time we moved.  How do kids have so much stuff?  My goal is to simplify their items even more.  I want to thank all the family and friends for helping watch our kids so we could do the moving!  I was overwhelmed with the lovely goodbyes from our wonderful neighbors.  You all are missed and I wish we could remain  close.  Within the first few days of moving I did meet a few of my neighbors and see great potential.

Thanksgiving was uneventful and tasty.  It was a quick in and out because we had moved just the day before.  Mr.Picky was already hard at work on our new home and checking projects off the list.  I was thankful this year to not have to do the turkey and main dishes.  I cheated and bought pies (this is terrible to buy food for Thanksgiving), but I had nothing unpacked to try to cook something.

Next was Mr.Picky’s birthday which was low-key and delicious.  I hope you all saw my Facebook post of the giant burger.  If you missed it tomorrow I will post how much fun we had eating and making it.

We adopted a 9 month old puppy at 70 pounds a few days before Christmas.  He is a Newfoundland/Lab mix and is one big love muffin.  He is fitting in so nice and was just the friend for us.  Mr.Picky has been hard at work to finish the fence around our place to keep the dog and kids in.  Having another boy in the house is just one more ball of energy.

Christmas was a bit overwhelming this year.  Every year we get invited to more and more events.  How does one say no?  We are our own family now and as much as I enjoy seeing extended family we need some traditions of our own.  Mr.Picky isn’t huge on crowds, especially when everyone celebrates on the same night and we have to go from house to house.  I see changes in the near future to this tradition.

My birthday and New Year’s Eve was wonderful.  I was surrounded by family and friends in our new home for the first time.  Lots of laughing, game playing, and junk food.  This was a night of new recipes for me.  We topped it off with an ice cream sundae bar.  We were so busy having fun we lost track of time and almost missed ringing in the New Years.

Between all these events I managed to paint the interior of our new house minus the bathrooms.  I am torn of the color scheme of both bathrooms.  The main bathroom will be an undertaking as I want to completely redecorated.  This kind of thing is fun for me and I can’t wait to share some before and after photos.

Now that life is calming down and school is about to start-up again I am happy to get into a routine.   Routine is everything in my life and I think that is what is making me so crazy.  When life gives you lemons start juggling until they all fall.  Of course you need to pick them up after that!
//

Surprise Candy Bar Brownies

With all that Halloween candy to use up we came up with some fun surprise brownies.  The kids had a blast adding in the candy bars.  It was even more fun to see what kind of candy bar you ended up with in your piece of brownie.  Tasty treat with a scoop of ice cream.

Happy little helpers!

Happy little helpers!

Don’t forget how important it is to get kids interested and in the kitchen.  They learn how to cook and be independent.  It is a memory they will never forget.  Recipes and baking are a great way to learn fractions and math.  Foodies are born in the kitchen, I grew up always helping in the kitchen and so will my kids.

Surprise Brownies:

  • 1 box or recipe for 9×13″ pan brownie mix, prepared and ready to pour
  • multiple fun size candy bars or larger ones but into bite size pieces (the more variety the better)


Prepare a 9×13″ baking dish by lightly greasing.

Pour 2/3 of the batter into the baking dish.

Follow by pressing different candy bar pieces into the brownie mix.  The kids love this part so get some helpers.

Surprise Candy Bar Brownies

Pour the remaining batter even over the candy bars being sure to at least cover each candy.  Spread with a spatula if needed to cover all bars.

Surprise Candy Bar Brownies

Bake as directed on box or recipe.

Surprise Candy Bar Brownies

Cool completely and serve everyone their very own surprise brownie.  You can serve them warm with ice cream as well, but the candy is extra gooey.

Surprise Candy Bar Brownies

(adsbygoogle = window.adsbygoogle || []).push({});

Funny Face Toasted Cheese Sandwiches

As a child I loved to make these funny face toasted cheese sandwiches. They are often forgotten in my house until the mood strikes me. My kids were so pleased to not only make their own dinner but to play with their food as well.

We arrived home late last night to no dinner plans.  I offered the idea of tomato soup and grilled cheese sandwiches.  This led me to the idea of Funny Face Toasted Cheese Sandwiches.  We had everything and most people do.  Even not making a face this is a tasty sandwich.   I’m not sure if it is tasty because this is a comfort food or actually good.

The possibilities are endless with these sandwiches.  As a child it was always an onion smile, olive eyes, and thinly sliced dill pickle nose.  We worked with what we had and to each person’s taste.

Funny Face Toasted Cheese Sandwiches

Funny Face Toasted Cheese Sandwiches:

  • sandwich bread, square bread works best
  • ketchup
  • medium cheddar or Colby jack cheese, sliced
  • onion, thinly sliced
  • olives, sliced
  • salami or pepperoni
  • bread and butter or dill pickles
  • Mrs.Dash or Italian seasoning, optional

Place a slice of bread on a baking sheet.  Spread about 1 Tbs of ketchup per piece of bread.  Sprinkle with Italian seasoning or Mrs.Dash if desired.

Funny Face Toasted Cheese Sandwiches

Top with sliced cheese and decorate with vegetables.

Broil sandwiches until cheese is melted and hot.

Great served just as a sandwich or with tomato soup.

Funny Face Toasted Cheese Sandwiches

Is it Bedtime yet?

Bedtime has just not been coming early enough.  With the weather changing life has become a little more rough.
We are adjusting to spending more time inside and a new schedule because my daughter started kindergarten this year.  The first few days of truly bad weather that has kept us in which has been challenging.

We busted out play dough, a movie, and water time in the sink.  It is time to pull some different ideas out for my special boy.
With only a few weeks into the school routine life has not caught up to it.  By the time my daughter is off to school I have time to get a workout and shower in.  Then it is too late to do anything because she only goes half days.  Then it’s lunch and nap and the whole day feels shot.

I feel the urge to wake up even earlier and exercise and shower.  But I have a hard enough time getting up as it is.
To anyone else out there who has never been a stay at home mother it is a lot harder than you think.  There is no me time and we don’t leave our kids very often. Whoever said you get to sit around and eat bon bons must be rich.  They would have to hire a chef, a maid, and  nanny to do my job.

Photo Party Favors

Like most of you, I get my children’s photos taken annually around their birthdays.  Of course I pass their photos out to friends and family.  This year I had wallets made just before the kids had their birthday party.  With a few different poses available I made up a little box with the photos inside.  I displayed a sign allowing each family to make the choice of their favorite pose of the kids to take home to enjoy for the year.

Along with other treats this made a great party favor for everyone.  I know this sounds simple but I love when I get to choose the photos I get of my nieces and nephews.  If you pass out photos already why not make a little display.

Photo Party Favors

Terrible Twos are now called Testing Twos!

What happens when one of those days is everyday?  We are counting down to less than a week away from my son turning two.  About a three weeks ago his attitude and stubbornness has really changed.  I know it is a phase but this is one heck of a stage.  The crying and whining is enough to put any parent into a crying sobbing mess of their own.

The terrible two’s everyone calls it.  From now on I think the terrible two’s is a not an appropriate phrase for this stage.  I know my son is one of the sweetest and most snuggly boys around, not to mention a real joker.  Testing twos is what I am calling this stage.  He is testing his limits with everyone and exploring just how far he can push.  He is also testing my patience, I used to think they were limitless.  Thank goodness for sleep at night so I can recharge and try to start a new day.

Did I mention that we are also beginning the why and what stage.  For those of you who have not experienced this, you are in for a real treat.  I love for my kids to learn and think it is especially important to learn by asking questions.  But at two he is asking why just for the heck of it.  Or if he is curious or I am not talking him to him he needs to ask what, because he needs to be involved in every conversation.

Everything that I thought I knew about discipline and communication is taken to a whole new level with child number two.  Every child is so different and they take a really different approach on how you deal with issues.  I have yet to find one that works well, so again my patience are being tested as I try new methods.   Mr.Picky’s mother tells me, “he is just like his father”.  All I can hope for is that this will pass and look forward to him becoming as great of man as his father.

My 5-year-old is a Foodie!

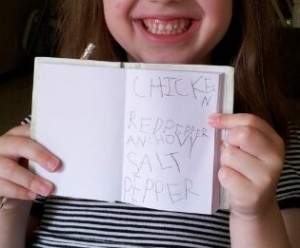
My daughter was playing kitchen and restaurant the other day, something I did often as a child.  She wanted to make a menu so she got out a notepad and pen.  Although we are learning to read, she can write well if give the correct order of letters.

With no help from me she came up with this menu including chicken, red peppers, anchovy, salt, and pepper.  I hope her palate develops as much as her creativity, she has definitely grown up in the house of foodies.  Not only do all the ingredients actually make sense but could really create something special.  I am so proud of my girl!

Child Foodie